CRICUT BASICS FOR BEGINNERS

GETTING STARTED WITH THE CRICUT MAKER
When I was a beginner and started using my Cricut machine I was lost! It was daunting and I didn’t want to break the machine, my accessories, or waste precious materials. I need some Cricut basics for beginners.
Through many years I have found tips and tricks along the way. I hope my complied basics for beginners will help you navigate the way around your Cricut machine to get started today. Drop me a comment or message if you have other questions that I didn’t cover.
I have a free download in my resource library that will tell you the top 5 tools to get started with your Cricut to make your crafting so much easier from the start. Free Resource Library
There are affiliate links in this post. I earn a small commission from qualifying purchases at no extra cost to you.
On this page you can look forward to the following topics below with links to quickly find them:
- Cutting Mats to use with the Cricut
- Materials you can cut with the Cricut Maker and Different Types of Vinyl
- Cricut Access – What is it? Do you need it?
- Working with Font and Downloading Font in Design Space
- Creating SVG Files
CUTTING MATS TO USE WITH THE CRICUT
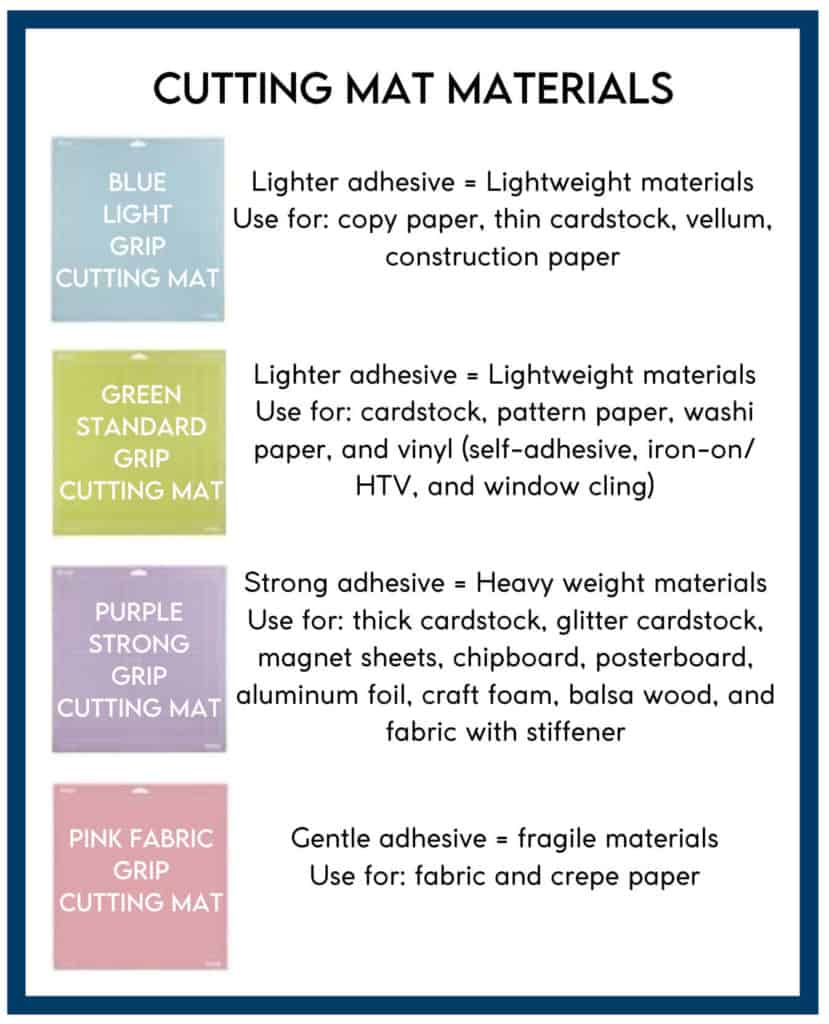
Here’s the skinny on the Cricut cutting mats, they need to be sticky. Take good care of them by rolling a lint roller after your cuts, wiping them with a baby wipe if residue was left behind, and storing them with the protective sheets in the right direction over them. If you misplace or think you will forget the direction of the clear protective cover, mark them with sharpie or vinyl to remind you.
It makes a huge difference in most projects if you use a sticky mat!
In general you can see below what each mat is supposed to be used for, but I’ll tell you if you have to get only one mat because you budget is tight I would go with the green mat. It can be use for most things, it’s just not always the best for every project.

Also I would not recommend the pink mat. It worked for a blink then became useless. Don’t waste your money. Many of the Purple mat suggested uses require a little more explanation, such as if you cut real leather attach a piece of contact paper to the back of the leather before sticking it to the mat to avoid making a mess of your mat. Another tip for thicker hard to cut materials like chipboard or basswood you may have to tape down your material before cutting. After your material is cut, check that the cut is as expected before you unload the mat. If it needs another pass cutting you can just press the Cricut cut button to cut on the same path.
MATERIALS YOU CAN CUT WITH CRICUT
There are so many materials that the Cricut Maker can cut, on the order of a few hundred!
As a general rule if you are going to cut something you have reservations about, do a quick search to make sure you find the best materials for your projects before you waste your time and/or ruin your materials. Chances are someone before you has been there and has a story to tell, especially if it went wrong the first time!
For example, if I were to start a project that had teeny tiny letters or objects to weed around I would not choose any vinyl. I would want a vinyl that cuts consistently and weeds effortlessly. I will tell you it will not be Cricut Shimmer Vinyl! It doesn’t cut or weed nicely. For this project, I would recommend Starcraft Vinyl.
Another example is if you want to make stickers. Take some time researching the best sticker paper. I think you will quickly find that Cricut’s Printable Sticker Paper doesn’t work in many common printers rendering this expensive product useless and frustrating. If you’re looking for a great printable sticker brand I would go to Online Labels.
I’m not trying to knock Circut’s products, but simply want to point out that it’s not always the best product for your project. Many frustrations can be avoided with a bit of research.
And always do a test cut!
I recommend the following two vinyl online retailers because they have fantastic customer service when you need advice on the best materials to use or to troubleshoot what went wrong.
- 143 Vinyl (formally 651 Vinyl)
- Craft Cutter Supply
Below are the most common materials that I work with on a regular basis. If it requires a special blade they may have not been included with your machine it’s in parentheses after the material.
- Cardstock of all weights
- Chipboard, Basswood (with Knife Blade)
- Posterboard, or Cereal Boxes (with Deep Cut Blade)
- Leather (my preference with Rotary Blade)
- Felt (my preference with Rotary Blade)
- Many Types of Vinyl (explained below)
- Sticker Paper and Labels
DIFFERENT TYPES OF VINYL FOR CRICUT
Quick tip on vinyl, label your vinyl after you open the packaging. I can’t tell you how many vinyl guessing games I’ve had in my crafting. Below are two main types of vinyl and their characteristics.
Adhesive vinyl is like a sticker with a colored side and a paper backing side. The paper backing covers the adhesive side of the vinyl. When using adhesive vinyl you will typically need to use transfer tape in most applications. Removable and permanent vinyl are the two main types of adhesive vinyl. Removable vinyl is commonly referred to as 631. That is the Oracle brand designation and is typically used for indoor and temporary applications. Permanent vinyl is commonly referred to as 651. That is the Oracle brand designation and is typically used for outdoor vinyl applications. If you’re just starting out they have many variety packs available on Amazon for pretty cheap. Note that there are glossy and matte options in addition to the removable/permanent types of adhesive vinyl. For most of my projects I use permanent vinyl. For more information on cutting and applying vinyl check out my Vinyl Decal Tutorial.
Heat Transfer Vinyl, also known at HTV or Iron-On Vinyl, is adhered to projects using heat and pressure. HTV will have a clear plastic carrier sheet over it’s top; this shiny side of the vinyl will go face down on your cutting mat when cutting. You must mirror the image before cutting for the image to appear right side up when pressing. You need to apply heat and pressure for the HTV to adhere properly. The vinyl manufacture should have cutting and temperature/pressure instructions. Again you can find HTV variety packs on amazon if you are just starting out. Maybe I’m boring, but my most used HTV is white and black. Be aware when shopping, there are glossy and matte HTVs, and so many different types like the stretch HTV that is best for t-shirts and stretchy material. For more information on cutting and applying HTV check out my Reverse Canvas Tutorial, or working with flocked HTV visit the Elephant Stuffy Tutorial.
CRICUT ACCESS – WHAT IS IT? DO YOU NEED IT?
Cricut Access, along with it’s monthly fee, is not necessary to use the Cricut cutting machine. Design Space is a free download, you need only a free account to use the software with your Cricut cutting machine. I will suggest if you can afford Cricut Access, and you are new to using Design Space, it will help you to learn to use your machine at a quicker pace. But if you are relatively computer literate, have access to the internet, and want to save some money there is no reason you need this monthly membership.
WORKING WITH FONT IN DESIGN SPACE
Check out the video below for tips on working with font including downloading & choosing font, and creating SVG files.
If your intention is to use the Cricut writing pens be sure to choose a writing font unless you want the outline of the font. They have these great adaptor tools that can use most Sharpies in your Cricut Maker. Check out the demo video below.
DOWNLOADING FONT TO USE IN CRICUT DESIGN SPACE
One very helpful site to download free font is Dafont. From this site you can download a number a free fonts. I love it’s preview capability that allows you to view exactly what your specific text will look like in each font. After you download it you have to take one extra step to add it to your system fonts. On a Mac you would simply add the font to your Font Book application. Before your new font shows up in programs you will have to exit and restart them. The video clip above will show this process of downloading font from this site and installing it onto a Mac computer. If you are using a PC, here are some directions I found to download fonts on WikiHow.
TIPS FOR CHOOSING FONTS
One of the hardest parts of my projects that include font is choosing which one to use. There are so many good fonts out there. One site that has helped me visualize what fonts I have installed on my computer is Wordmark It. This site will show you exactly how the text will appear in each font that is installed on your computer.
CREATING SVGS FILES
The program I use to create SVGs is called Inkscape and is a free download from the internet. I use it all the time. It opens a whole new world of creating your own SVGs, and is much easier to work with font, once you get the hang of it. There are many paid and free online tutorials for learning how to use Inkscape. One of my favorites that I used when I was a newbie was Nick Saporito at Logos by Nick. After trying to learn Inkscape on my own with my limited and disconnected time available I ended up paying for the course Cut Above SVG Design Course. It was well worth the money and was a concise, ordered, go at your own pace online course.
CHOOSING SVG FILES
The possibilities are endless! Probably the most difficult step for me is deciding on what to make and what images to use. Cricut Design Space has many cute options. If you have design access they will be free to use with your monthly fee, or you can purchase them individually and always have access to them regardless of your membership status. You can easily order design files off sites like Etsy, or many sites on the internet have free svg files to download. After the files are downloaded, you just need to upload them into Cricut Design Space.
If it’s a monogram your after, I recommend using the free app Monogram It. It’s very easy to navigate and save images of single letters or monograms in their swirly cute fonts with cute borders and upload them directly into Cricut Design Space.
I hope this Cricut Basics for Beginners was helpful, please let me know if there is something else you would like to learn about using your cricut and I’ll do my best to publish it.
Now let’s get crafting!
Related Cricut crafts:
CRICUT BASICS FOR BEGINNERS

